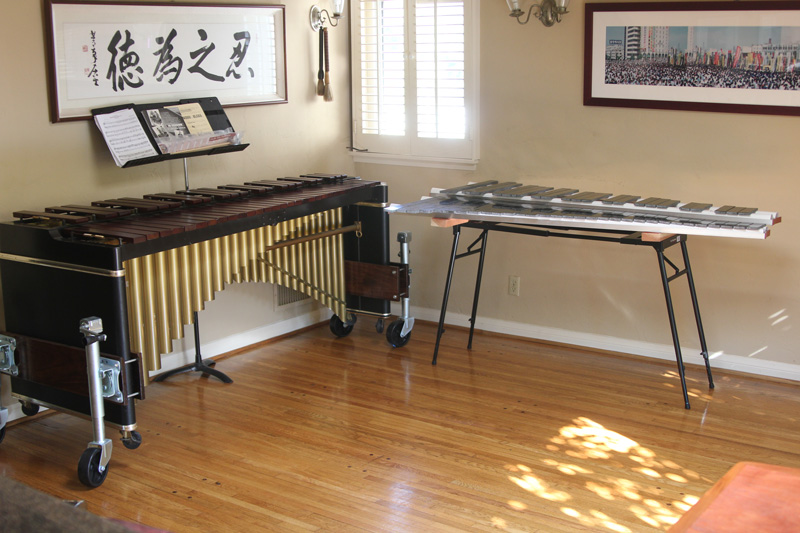
4.3 Octave Granite Lithophone
Michael Chwe, September 2011
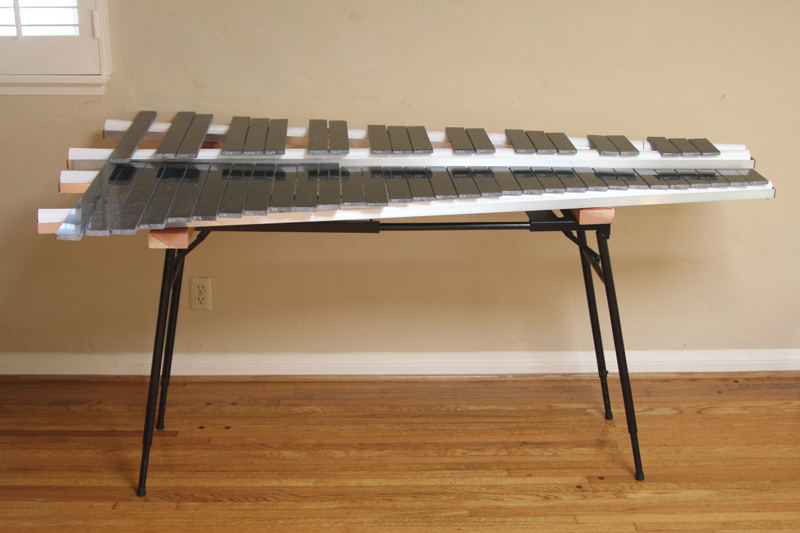

This summer I made a lithophone out of granite
tile with a range of
4.3 octaves, going from A3 to C8 (essentially the top half of the piano). A lithophone is a mallet
instrument (such as a marimba or xylophone) in which the bars are
made
out of stone. Some of the earliest musical
instruments are lithophones.
Click here to hear an excerpt of Monograph
IV by Richard
Gipson played on the lithophone (by Hanyu Chwe). To hear its
entire range played by different mallets click on one of the following
links (mallets with hard plastic
heads, wound cord heads, brass heads, rubber heads).
Total cost of materials was roughly $300 ($200 for the granite bars,
$40 for the aluminum
U-shaped channels which support the bars, $10 for the wood
supporting the aluminum channels, and $50 for the folding black metal
stand which supports it all). The stone-cutting saw
used for the project cost roughly $100, so it was relatively
inexpensive considering that most mallet instruments with a 4.3 octave
range cost well over $2000. No special skills were
required. I had never cut stone tile before, but it was not
difficult to learn. Most of the work (around 10-15 hours) went
into cutting and tuning the granite bars. The lithophone is 6 feet (183 cm) wide,
height-adjustable, and easily portable.
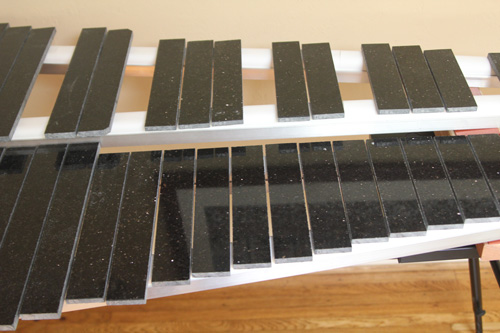
Bars
I used "Black Galaxy"
granite (it is black with silvery specks) ordered through Bourget Brothers (a local stone
shop) because it produced a good sound and was relatively low
cost. I cut the bars
2 inches (51 mm) wide. The length of the bars range from 4.7
inches (119 mm) long to 22.5
inches (571 mm) long (for a
complete list of dimensions, click here).
I cut the shorter bars (from E5 to C8) out of 12 inch by 12 inch (12 x
12) square tiles, which were roughly 10mm thick and cost around
$10 each. I cut the longer bars (from A3 to D#5) out of 18 inch
by 18 inch (18 x 18) square tiles, which were roughly 12 mm thick and
cost around $25 each. I used roughly 6 of the 12 x 12 tiles and 5
of the 18 x 18 tiles.
Tuning the bars
I tuned each bar by
hand, removing small amounts off the ends of the bars until the correct
pitch was reached. I used an Korg OT-12 electronic
tuner (now replaced by the OT-120)
to reach the correct pitch. Tuning by hand is required because
individual tiles vary (in thickness for example) which affects the
pitch (thicker
tiles have higher pitch). With the tile saw, it is easy to
grind off very small "slivers" off the bars (0.5 mm or even less) and
tune each bar to within 10
cents (10 percent of a semitone) of the correct pitch.
A tile saw is really a grinder: a rotating metal disc with embedded
diamonds grinds a roughly 1 mm groove in the stone. The disc
rotates in a pool of water, which gets you and everything around you
wet. It is definitely something to be done outdoors. But it
is not difficult or unsafe (I used a full
face shield, which is more comfortable than safety glasses, a simple
respirator, and ear
protection). I was worried about breathing in granite dust
and getting hit in the face with bits of stone, but the process is wet
enough that this is not an issue. You end up with a lot of
granite mud. Tile saws can be large and expensive, but the small MK
Diamond MK-145 was more than adequate for the job.
The main difficulty in tuning the bars was that the electronic tuner
(and the Korg OT-12 is supposed to be one of the best) often had
difficulty locking on to the correct pitch, perhaps because bars have
unusual overtones and also because their sound does not sustain very
long.
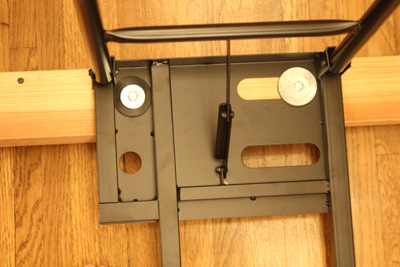
Supporting the bars
One novel aspect of my design is how the bars are supported. In
my lithophone, the bars are supported by an arch of paper, which is in
turn supported by aluminum U-shaped channels, 2 inches (5 cm) wide and
1 inch (2.5 cm) high.
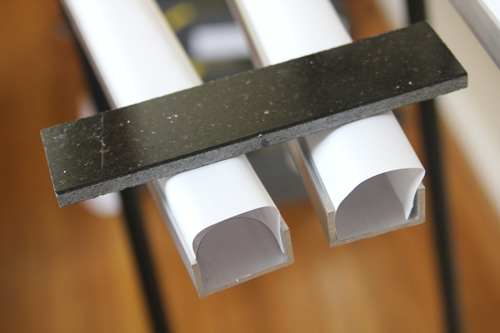
One problem with paper is it eventually sags, as shown in the channel
on the right in the photo above. This is especially a problem for
the heavier lower-pitched bars. To fix this problem, I first put
a piece of rigid plastic inside the channel to
prevent the ends of the paper, the "base" of the arch, from being
pushed inward away from the edge, as shown in the channel on the left
above. Second, I used two or three sheets of paper for greater
support. I ended up using 110 lb cardstock
(what index cards are made of). I cut a 8.5 inch by 11 inch
sheet in half lengthwise to get a 4.25 inch by 11 inch sheet. For
the plastic inside the channel, I use PETG plastic, 0.020 inch thick, cut to
2.5 inch by 12 inch sheets. For the higher pitched bars a single
sheet of paper works fine, but for the lower pitched bars as many as
three are necessary to prevent sagging.
I was inspired to use paper arches by the book Musical
Instrument Design by Bart Hopkin, which suggests supporting bars
with balloons. Since balloons are such low mass, they do not
dampen the bar's vibration, regardless of where the bar is placed on
the balloon, and the balloon surface provides more vibrating area,
improving the sound. I experimented with air
pillow bags (a common packing material) which also sound great, but
like balloons deflate over time. Paper arches turn out to be
similar to balloons, amplifying the sound with little damping (for
example, whether a bar is supported by its nodes or not does not affect
the sound). A
video explaining the design is available here.
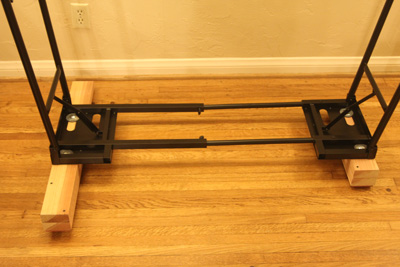
Supporting the channels
The aluminum channels are supported by wood 2 x 4 lumber, as shown
below. The left-hand wood support is a 15 inch board attached to
the top of a 30 inch board, and the right-hand support is an 8 inch
board attached to the top of a 16 inch board. Glued to the top of
the boards are sheet rubber, to maximize friction with the aluminum
channels (sheet rubber is also glued to the ends of the aluminum
channels to keep them from scratching things).
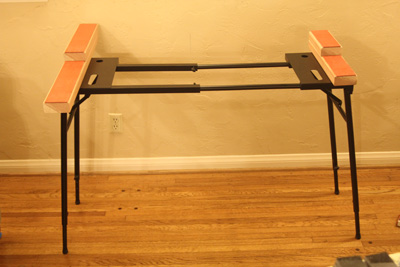
The wood supports are in turn attached to an inexpensive commercial
keyboard stand (model KS7150 made by On-Stage Stands). Wood
screws, large "fender" washers and large rubber washers are used, as
shown below.
Adjustability and portability
This lithophone design is very adjustable. The granite bars can
be placed anywhere on the paper arches. The aluminum channels can
be placed anywhere on the wood supports. With the aluminum channels, one can
also easily use arches made of different materials,
such as plastic, mesh, or metals. The height of the keyboard stand
itself can be adjusted by extending its legs (admittedly not as
convenient as a crank, as in this
design). To
transport the lithophone, the granite bars and aluminum channels can be
carried separately and the keyboard stand can be collapsed and
folded.
Disadvantages
The main disadvantage of the
design is that since the bars and channels are not attached, a large
sideways shock could cause them to fall. The granite bars can be
surprisingly fragile; I tossed the C#4 to the grass from a height of
one foot and it broke into two pieces, and thus I had to make a new
one. The lithophone also must be picked up by the legs to be
moved, if you don't want to remove the bars first.
Experimentation
I tried granite at first,
but many kinds of stone (and ceramic tile, which is fired from clay and
can be much cheaper) sound good and could be tried. For me,
getting granite in large enough lengths was the main constraint on the
lithophone's range. I had to cut the larger bars out of the
diagonal of a 18 x 18 tile. I could have made a G3 bar and G#3
bar, extending the lithophone's range to 4.5 octaves, but each bar
would have required buying a single 18 x 18 tile, which seems
wasteful. I once ordered a 24 inch by 24 inch tile, but it was
much thicker (roughly 0.75 inch thick) and thus would not have
necessarily reached lower pitches even at much longer bar
lengths.
Instead of simply a longer bar, another possible method for lowering
pitch, as used in the wood bars in marimbas, is to hollow out or cut a
notch in the middle of the bar, reducing the bar's stiffness. I
haven't tried this yet. When I cut bars diagonally out of square
tiles, I ended up with trapezoidal (not rectangular) bars, which often
sounded very good, perhaps because they might have different overtones
than rectangular bars.
Many mallet instruments have resonator tubes to enhance the
sound. I haven't tried this yet but resonator tubes would be
compatible with the paper arch support design here.
Musical qualities
Notes played together on the lithophone sound great as long as they are
close intervals, within an octave. Triads sound great too.
However, tenths (an octave and a third), elevenths (an octave and a
fourth), and twelfths (an octave and a fifth) sound bad because the
first overtone of a vibrating bar is a sharp eleventh (octave and a
fourth), as explained in Bart Hopkin's book.
Even octaves on the lithophone can sound strange.
Here is the lithophone next to a M250 Musser marimba (adapted to be height-adjustable) which
also has a 4.3 octave range but is an octave lower.
Questions and comments
If you have any questions or other
suggestions, please contact me at michael@chwe.net.
Thanks!